Saturday, February 25, 2012

Self Critique 


I feel that my animation was done quite well except for the bouncing ball part.  I really like my animated robot and the squash of the box. Some parts that aren't done well are the picking up of the second box as the head was not place nicely above the box. The ball bouncing from the box to the head of the robot and also from the head to the ground was not very realistic too. The bouncing of the ball was not very sharp too i guess as i did not adjust the curve on the graph editor well. These are the only things that were not done perfectly. The rest was perfect. 

My principles of animation was firstly the robot shaking it's head showing that it's sad from doing all this picking up the box work. The second was the going 'crazy' part showing it's frustration by swiveling left and right and eventually letting it's frustration out by smashing the box and squash and stretch was applied to the box. The slow movement up after that shows like 'what have i done' kind of feel. Next was when the ball arrive on top of the box. The robot bend forward staring at the ball shows that it is surprise to see a ball on top of the box he was suppose to pick up. The slight vibration of the ball shows that it is going to bounce. The robot head following the ball going up and down up and down shows the robot thinking what's the ball doing.

When the ball bounce on the robot head, the robot head moved down a little and try to move up but went down when the ball bounce on top of it again. After the ball bounced away, the robot look in front and shake it's head to show that it's thinking what just happened. 

Sunday, February 12, 2012

Week 12 Reflection

Week 12 was just following 13 videos and doing it. It sounds easy but no matter how well i follow the video and do, it will be different from how the video has done it. I was not able to achieve the exact same thing as how the video did. An example was the placement of the ball and moving the camera. I was not able to show the ball bouncing nicely from the start to the end. However, i learn the skill of the graph editor on how to make the ball bounce more sharply. Overall, although there are really a lot of video and each video lasts for like 10 minutes, i used a couple of days to do it as it is difficult to sit still to watch and do for 30minutes.
Week 12

change the grid setting

create a plane with width and height both 400 and subdivisions 4


create a sphere and set radius to 15


adjust the cameras under display > show > cameras


create > camera > camera and aim


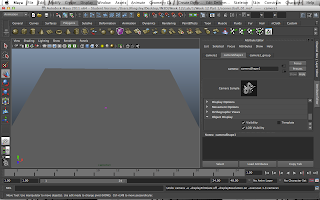
go to the attribute > Object display and set loacator scale to 20


scarifice the side view. Go to panels, perspective, camera1. Now you can see what the camera is seeing


Turn on resolution gate


adjust the camera angle so that the plane is within the resolution gate


Assign Blinn material and select ramp from the render node


assign new material to the plane. Choose file from reder node and select the rosewood diffuse image


create reder node for bump mapping, select file and select the rosewood BUMP image given.


you will see bumps when you render it.


reduce the bump depth to 0.2 to make it look more normal


adjust the ball to where it will at frame 1


Lock translate Z, rotate X and Y and scae X Y Z and visibility


set a keyframe at frame 1


move the ball to the centre, on the ground and set a keyframe at frame 24


move the ball to the other end set a keyframe at frame 48


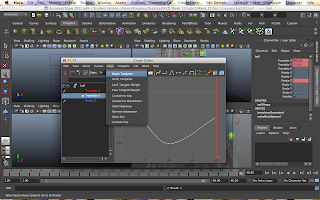
open graph editor and click translate Y


select the middle point and break tangent


move both curve up


move the first and past point curves up too


Go to translate X


delete the centre key


Go to curve and weighted tangents to adjust the bounce a little better


Video Outcome


Reflection for Week 13

Week 13 was quite easy because teacher was going through it in class. I learnt the most important thing in animating and that is whenever you want to set a keyframe to move something, you gotta set a keyframe first before setting the motion and seting the keyframe. The difficult part is to set the bottom of the machine to go just nice above the box. You have to know which one to move, the arm control, the swivel base, etc. Different area move different parts and gives different expressions. Getting the timing right was a tough one too. Overall it was quite exciting and amazing to be able to animate this.
Week 13(Exercise 4)


1)  Apart from their different sizes, it is obvious from Luxo Jr. that the big lamp is “older” and that the small lamp is “younger”.

How is this communicated by the animation? Give at least THREE examples.

Do NOT say because the small lamp is playing with a ball, or that its name is Luxo Jr. – you should be looking at the animation, how the lamps move and emote (emote means to express emotions).


1.The way the smaller lamp hit the ball, like how an enjoyable kid would be like.

2.The way the smaller way jump and it's sound, like in a very childish and kiddy way, whereas the bigger lamp is just standing there, looking very matured.

3. The smaller lamp sad expression sound when the ball punctured and the bigger lamp was not sad and no expression because it was just a ball. 


2)  Give an example from Luxo Jr of how timing is used for comic effect. Explain how the timing decisions contribute to the humor.

The timing of the part when the bigger lamp was shock, protruding his 'head' out and the shock sound effect when the smaller lamp came back with a bigger ball.

3)   When you create a joint chain, these form a hierarchy, with the first joint at the top and the last joint at the bottom. Explain why this is necessary for the joints to work properly.

This is so that the 'arm' can move more naturally and realistically. 

Sunday, February 5, 2012

Scenario 1


1. Character


NAME: ASTROY

"Why am i build to do this low life job"(1. He turns and look at the line of boxes on the conveyor belt)

"This is so tough and tiring"(2. he faces down and shake his head in sadness)

"Why can't i be a bigger robot rather than just a hand. A robot that goes around saving the world than stacking boxes"(3. He looks up in the air imagining being a super robot for a minute.)

"I guess i will never get to be upgraded to a bigger and a heroic robot."(4. He faces down and shakes his head sadly.)

"I HATE MY LIFE!!!"(5. He goes back down harshly and smashes the next box that came in stretch and squash.)


2. Storyboard

Storyboard: Astroy was build by this scientist to help lift boxes. But he hate lifting boxes as it was a low life, stupid job. There isn't any meaning in life lifting boxes. He hated his life until something happen......


1.Astroy picks up the first box and put it in position
2. Astroy then turn and look at the boxes coming in one by one
3. The next box came to him
4. He faces down and shake his head in sadness
5. He picked up the second box and put it in position again
6. He looked up to imagine 
7. He started to get frustrated and smash the third box
8. The next box came in and to his surprise, there was a ball on top of it
8. The ball suddenly bounced on top of his head
9. It bounced twice again on his head
10. It bounced away after rebounding from astroy forehead
11. Astroy turned and watch the ball bounce away in awe
12. Astroy found it weird
13. Could it be god giving him powers?
14. Nobody knows as astroy disappeared the next day.


1.

2.

3.

4.

5.

6.

7.

8.

9.

10.

Week 13

Parent the arm ends, pins and joints 

parent all of them  under swivelbase


IK handle too the top and bottom joints


set locator to position


Create annotation arm control


constrain > point arm control and ikhandle1


constrain > orient arm control and joint 4


lock arm control translate X


lock swivelbase rotate X and Z


parent ikhandle1, arm control and swivelbase


adjust the arm control till it's diagonally above the box


move the arm articulated to a compressed pose


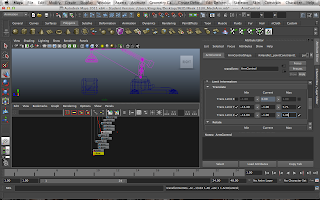
open attribute editor and open the limit information and then translate and set the trans Y and Z min and max


right click joint 1 and click collaspe


set arm control translate Y to -9 and Z to 0


select arm control and cargo and parent them


select swivelbase and change translate Y to -100


select platform then cargobox then parent them


select cargo and change platformW1 to 0


select swivelbase and set rotate Y to 0


select cargobox and set armcontrolW0 to 0


create a floor


middle mouse click swivelbase to armbase


create camera and change focal length to 50


set camera angle


go camera setting and click resolution gate


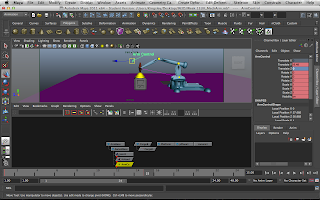
set a keyframe at frame 1


set keyframe at frame 15 when robot is touching box


select armcontrol and cargobox and then constrain > parent and check maintain offset


give the cargobox a keyframe at frame 15


change blend parent1 to 1 so that the machine and the box are stick together at frame 16


pick up the box and set a keyframe at frame 28


set a keyframe at frame 25 before turning swivelbase


at frame 45, set rotate Y to -90 and set a keyframe


select armcontrol put the box down at frame 65 and set a keyframe


select cargobox and set keyframe at frame 65


go to frame 66 and set blend parent to 0


lift up the machine and set a keyframe at frame 79


Video Outcome